How to remove scabs without leaving scars
If you are a guy, scars are cool. If you are a girl, this post is for you.
After taking my stitches out, I was left with a bunch of scabs around the wound.
Much googling and experimenting later, I have come to the conclusion that this is the best way of removing scabs.
NOTE: this is for old scabs. My scabs were two weeks old and almost ready to come off. Do not pick at new scabs.
.
What you need: hot water, cotton, gauze, petroleum jelly, tape for dressing.
STEP 1: Wash your hands thoroughly with soap and water.
STEP 2: Ask someone to boil water and give it to you. Put a lid on it so it doesn’t cool.
STEP 3: If you have many scabs, its better to tackle each one separately. Start with the smaller ones first. Dip a small piece of gauze or cotton into the hot water. Press it against the scab (make sure it isn’t so hot that you burn yourself). Continue to wet the cotton if it cools down and hold it against the scab for a total of 2-3 min. This makes the scab and the skin around it soften.
STEP 4: Use gauze to rub around the scab. Rub up and down and left and right. Or place your finger on top of the gauze and twist around in a circular motion. The scab should come off painlessly.
STEP 5: Repeat hot water and rubbing procedure with each new scab. If Its not ready to come off, leave it and and try again the next day.
STEP 6: By now some scabs will have come off, but the bigger, more stubborn ones will still be there. Coat all the scabs liberally in petroleum jelly (the plain non-scented type). Cover with gauze dressing and tape it. Leave it on overnight. This keeps the scab moist.
.
Repeat the procedure every day till all the scabs come off. Petroleum jelly at night… hot water soak and scrub in the morning.
I had about 14 scabs and it took me a week to get all off. The biggest one came off last.
Patience, and persistence.
Nutrition: Foods that speed up fracture healing
Google has a lot of information on food that is good for your bones, ie. helping fractures heal quicker.
Even though you are mostly sitting around, your body is in high gear and burning a lot of calories while trying to repair itself. So you need to supply your body with enough fuel for it to do a good job.
First I will give you my menu, followed by and explanation of why each food is important and what nutrients it gives you.
(Reference – I am female, age 33, weigh about 50 kgs. Adjust portions according to your requirements)
.
MORNING
coconut water – (potassium)
one apple plus any other fruit – (vitamins)
2 scrambled eggs on toast (2 whites with one yolk), chicken salami/ chicken sausages – (proteins, carbs)
one glass low fat or skimmed milk – (calcium)
.
AFTERNOON
one glass freshly squeezed orange juice – (vitamin C)
Fresh salad – tomatoes, lettuce, sprouts, olives, feta, dressing – (vitamins)
quinoa or rice with other veggies like peas/ carrots/ potato – (vitamin A, carbs)
any protein – chicken/ fish/ soya/ cottage cheese/ lentils/ chick peas – (proteins)
.
SNACKS
banana yogurt smoothie – (potassium, vitamins, calcium)
muesli/ oatmeal/ granola bar/ peanut butter sandwich – (protein)
seeds – pumpkin/ flax/ sunflower – (vitamins, minerals like magnesium, zinc)
dried fruits – almonds/ cashewnuts/ walnuts – (vitamins)
.
EVENING
soup: stock made from boiling chicken bones is great – (minerals)
green leafy veggies – spinach/ broccoli/ beans/ cabbage – (vitamin K)
bread or roti with other veggies like peas/ carrots/ potato – (vitamin A, carbs)
any protein – chicken/ fish/ soya/ cottage cheese/ lentils/ chick peas
dessert – icecream or yoghurt with fresh fruits
.
.
FOODS THAT ARE BAD FOR BONE GROWTH:
1. Salt
2. Sugar
3. Alcohol
4. Caffeine (this includes soft drinks like coca-cola)
5. Smoking
It’s difficult to give up salt and sugar altogether, but try to cut it down.
.
TIP: Also, try to sit in the sun for a while everyday! Vitamin D helps bones absorb calcium.
Post-surgery complications
A side effect of the surgery was that I developed thrombophlebitis in my arm where they had inserted the IV drip in hospital.
What it is: Basically, your vein is irritated and unhappy from the general anaesthesia and all the strong drugs that went though it from the IV drip.
What it feels like: Your arm hurts, specifically, the line of the vein hurts from wrist to elbow. It hurts even if you touch the vein. For me there was no redness or swelling, it looked normal from the outside, but it hurt all the time. It feels like your vein will tear or snap if you stretch your arm. I couldn’t stretch my arm or hold things in my hand.
What can you do to ease the pain: Hot compresses – I used a heat pack. Exercise – everyday try to move or stretch it a little further than the day before. Use a squeezy ball in your hand. Some kind of gel or cream for thrombophelbitis prescribed by your doctor.
How long does it last: For me it lasted 3 weeks. For the first week it was sore and I couldn’t move it much. The second week it improved, I could hold things and use my arm a little. By the third week it was almost back to normal, except for a little twinge now and then.
Thought for the day
Tips on using crutches
CORRECT ADJUSTMENT
– Crutches should not be exact armpit height, they should be one or two inches lower than your armpit when you are standing straight on one leg.
– Adjust the hand grip to be level with your hip. Your arm should be slightly bent when your hand is holding the middle part.
– Do not lean on the top part of the crutches with your armpits. Put the weight on your hands and use your upper arm to hold the top part of the crutch close to your sides.
STAIRS
Going down: Put both your crutches on the lower step. Bend your knee and bring your good leg down between the crutches. For every step going down, crutches first and then the good leg.
Alternate method: This is only possible if is there is a railing on the side of the staircase. Hold one crutch on the bad side. Hold the railing with one hand. Crutch first on the lower step, follow with the good leg. Continue to hold the guard rail and repeat.
Going up: This is the other way. Keep your crutches on the lower step. Put your good leg on the step above. In one move, straighten your good leg to stand on the upper step, while bringing both crutches up as well to either side of your leg. There may be a slight wobble when you are stepping up, but bringing the crutches up quickly will support you.
Alternate method: This is only possible if is there is a railing on the side of the staircase. Hold one crutch on the bad side. Hold the railing with one hand. Put your good leg on the step above. Straighten your good leg to stand on the upper step, while bringing the crutch up on the other side.
SITTING AND STANDING
This is pretty unsteady on crutches. Use one arm to push yourself upwards from a sitting position while holding crutches in one hand. Balance on one leg while putting crutch under each arm. When lowering yourself down, let go of one crutch and put a hand on the seat or armrest first.
GOING OUTSIDE
Use a fanny pack to keep your phone, wallet and keys. Position it in the front of your body, not side or rear.
Refer to this post for pictures – http://www.wikihow.com/Use-Crutches
How to shower or bathe with a cast
Obviously, your cast or plaster is not supposed to get wet.
After many unsuccessful attempts, I have concluded that double bagging is the way to go.
STEP 1: Take your pyjamas off! Once you have put two bags over your foot, its very difficult to remove clothing over it. Common sense, yes, but I have made this mistake.
STEP 2: Take a kitchen garbage bag and tape it to your leg using 2-3 inch width plastic transparent masking tape (Do not use paper tape, this gets wet and soggy). Tape it around 2-3 times to make sure water won’t go in. Squeeze the extra air out of the bag before taping, to avoid having a balloon attached to your leg. Fold the tape over to make a tab on the end of the tape before sticking it down, this makes it easier to remove so you don’t spend 5 minutes trying to get it off.
STEP 3: Over this put another, thicker plastic bag (I use the amazon plastic bags that come when you order books online). Squeeze the air out around your leg, tape around it with the same tape, 3 times around your leg. Make a tab for this too.
OTHER TIPS:
– If you have a shower, buy a knee-height plastic stool and keep it in there. It’s a lot easier sitting down.
– After showering, I sit on the toilet seat lid to dry and dress myself. Use a hand towel to cover the lid to protect from germs. Also, if you are wet from after the shower, you tend to slide off the seat, so the towel prevents that.
– Going to the bathroom on crutches is really difficult! For inside the house, a walker is easier than crutches. A walker doubles up as a hanger for clothes and towels when you are bathing.
– For brushing your teeth, either do it in the shower while you are sitting down, or use a chair near the sink. Place the chair with the back facing the sink and kneel on the seat. If its a chair with a cushioned seat, like a dining chair, this is the most comfortable.
– Computer chairs with wheels are good for scooting around the house! Like a wheelchair but not as bulky.
Thought for the day
Types of Pain
So I’ve categorised pain into different types following my ankle surgery. It may help when you need to describe to your doctor.
1. Bone Pain (intensity: 9 on a scale of 10)
The only reason I haven’t give it a 10 is because I’ve reserved that for multiple bone fractures, or amputation. I describe this as wanting to cut off your own foot and throw it away, the pain is that bad. Bone pain comes suddenly, sharply, you feel it deep in the middle of your bones, for me it would only stay a few minutes but strike a few times a day and leave me sobbing. Apparently its your body trying to reject the nails and screws and foreign bodies in there.
2. Cast Pain (intensity: 8 on a scale of 10)
If your cast is fit properly, this should not happen to you, but if your foot swells after they put the cast on, its crazy painful. The hard plaster-of-paris cast was cutting into my bone and putting way too much pressure on the already painful incision area. I cried and screamed until the doctors physically cut the cast off my leg. Then they put on a lighter, better fitting cast. TIP – Fibreglass casts are lighter.
3. Surgery Pain (intensity: 7 on a scale of 10)
This is the area where they made the incision and stitched it up. It is a flesh wound, but pretty deep so you still feel localised pain around the ankle. This being a flesh wound is a familiar sort of pain, unlike bone pain which was something completely new for me, and something no one should ever experience.
4. Removing stitches (intensity: 6 on a scale of 10)
They will tell you it doesn’t hurt. It does. This is 10-12 days after the surgery.
5. General pain (intensity: ranges from 3-5 on a scale of 10)
This is a dull ache of the entire foot. This stays all the time, 24-7 for the first week after surgery. Painkillers do nothing for it.
It has now been 17 days since my surgery and the pain is at a 2.
It gets better.
Slowly.
Surgery
“Its a small procedure”
“Half an hour and it will be done”
“Don’t worry, its a very small incision”
Don’t believe what they tell you. Thing is, nobody tells you about the pain. Nobody tells you that after the operation, in the recovery room will be the worst pain of your life. A pain so bad you can’t breathe, you can’t speak. A pain that knifes through your bones like a searing hot sword or blade, again and again and again.
After the operation, I discovered what pain meant.
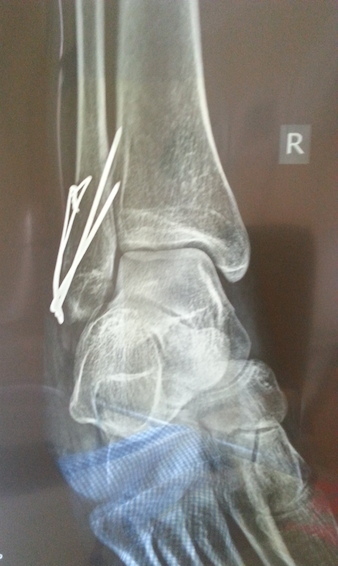
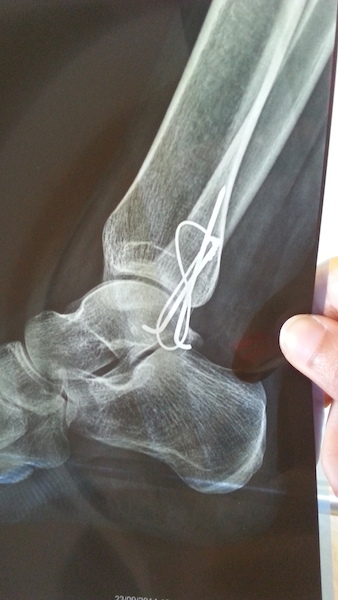
There are 2 giant nails and a wire in my right foot.
The terrible bone pain lasted for 5 days. Painkillers did nothing.
Sorry to scare you if you are just about to have ankle surgery. But I really wished someone had told me about the pain.
